The story so far
This course is about making CRUD apps. You know how to do C(reate), and R(ead), and all the appy goodness behind them. Now let's add D(elete). We'll also firm up the way we connect pages.
This lesson is longer than most. Much of it is review. You've already seen how to work with TaffyDB, list data, and add new records. This lesson explains that again, as one last check. Go through the code. You should be able to follow it without much trouble. It will give you confidence that you know what's going on.
Plan to take a break part-way through the lesson. I'll remind you.
Fleet
Our company owns a fleet of ships. We want an app to manage fleet data.
Here's the initial data.
var startingFleet = [
    {
        id: 11,
        name: "Stan",
        displacement: 26.3
    },
    {
        id: 24,
        name: "Dipper",
        displacement: 29.1
    },
    {
        id: 53,
        name: "Mabel",
        displacement: 28.1
    },
    {
        id: 94,
        name: "Soos",
        displacement: 36.3
    }
];
We have four ship records, each with three fields. The first field is id, the primary key. We'll finally get to use the PK in this app.
You can try the app. First, initialize the database. You can the list the ships. That list page is public. There is also an admin page. Later, you'll learn how to put admin pages behind a login form.
Pages
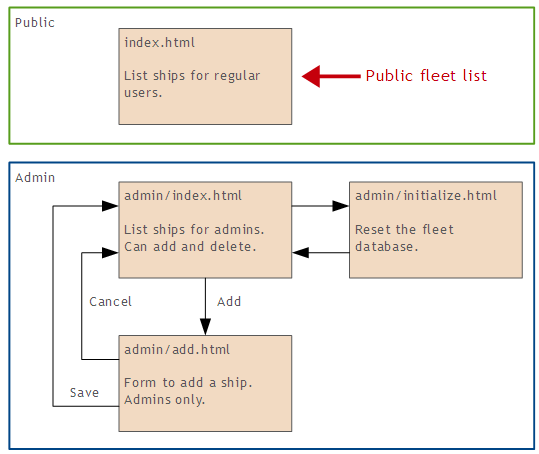
We're starting to get a bunch of pages now, so let's add a page diagram. It shows the different pages that will make up the app, and how you go from one to another.
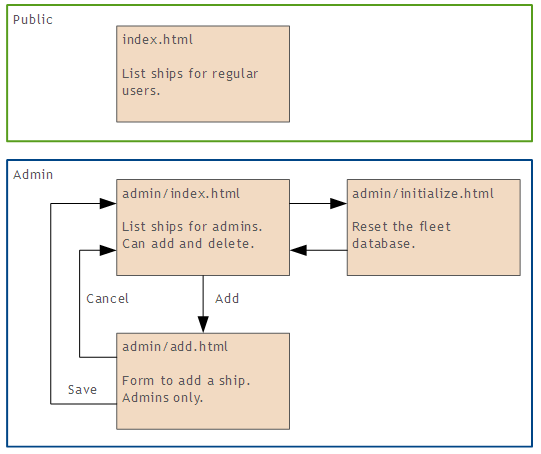
There are two parts to the app. First, there's the public part, that anyone can see. It's just one page, index.html in the app's main directory.
Second, there's an admin part. It's used by administrators to update the data.
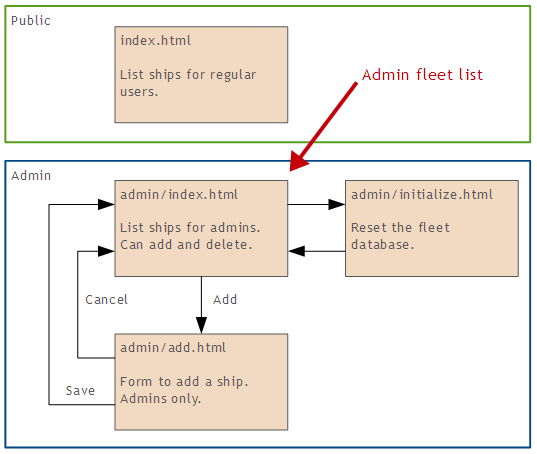
Some things to notice. First, there are two pages that list ships.
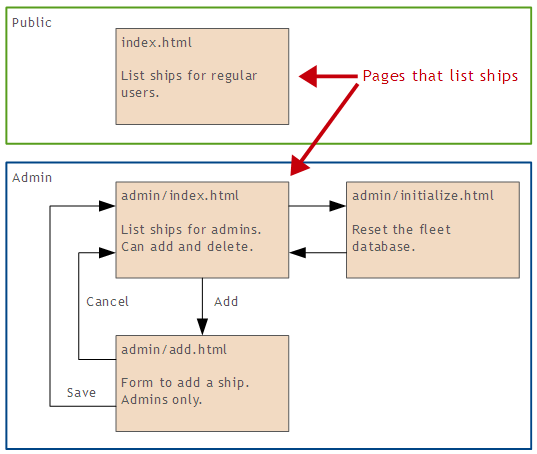
One page is for regular users, and another for admin users. Some web apps use one page for both, with if() statements to show extra elements on the page for admins. We won't do that. We'll use separate pages, to make the code easier to write.
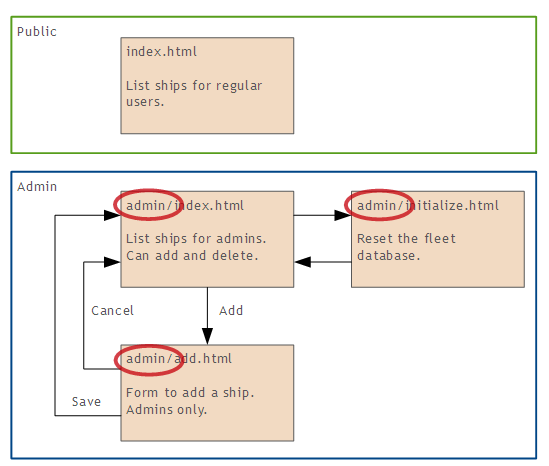
Second, all of the admin pages are in their own directory.
Here's how the files will look on the server.
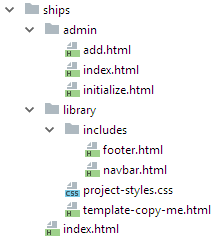
The library has the includes, style sheet, and template.
Screens and pseudocode
So, we'll have an app that shows data about a fleet. It will have a public page (just one in this app), and admin pages. The admin pages will be in their own directory.
Let's have a look at the pages, and the pseudocode for each one.
Public fleet list
Let's start with this page:
Here's the page:
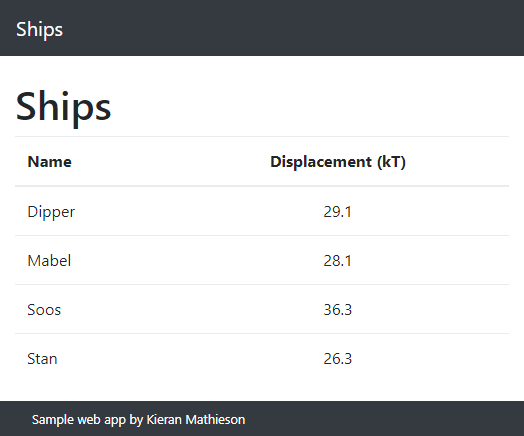
It just shows the list. No buttons, or links. There is no Add button; it's moved to another page.
We'll only need code for one event:
On page load:
    Make a TaffyDB
    Bind the TaffyDB to localStorage
    For each ship record:
        Show the ship record
Good question. Pseudocode is a plan, or specification, for the code on a page. Planning the code for every page first helps me keep a high-level view of how the different pages fit together, to make the entire app.
You don't have to do things this way. Do whatever makes sense to you.
So we have plan for the public fleet list page.
Admin fleet list
Now the page that shows the fleet to admin users:
Here's a screen shot:
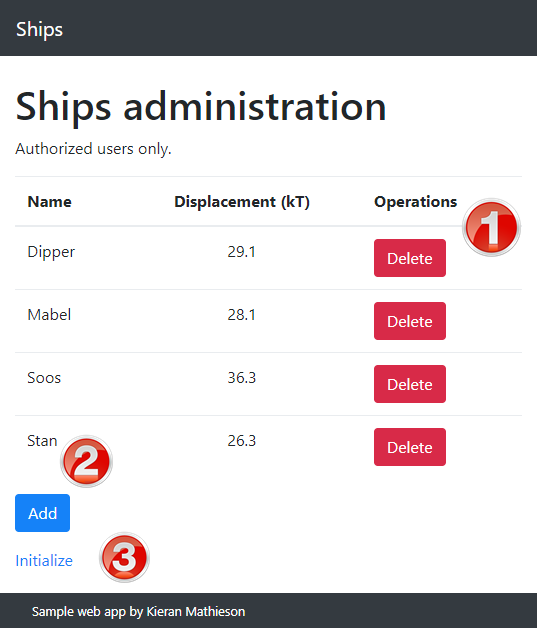
The screen is almost the same as the public list, except for three things.
- Each record has its own delete button.
- There's a button to add a new ship.
- There's a link to the DB initialization page.
The Add button and the Initialize links are regular <a> tags, with no extra code. We don't need pseudocode for them.
There are only two events that need code:
- Page load
- Delete button click
The page load event is going to make the table, with the delete buttons.
On page load:
    Make a TaffyDB
    Bind the TaffyDB to localStorage
    For each ship record:
        Show the record, with a delete button
Now the code for the Delete button.
On delete click:
    If user confirm:
      Delete the record from the database
      Update the fleet list
{
    id: 11,
    name: "Stan",
    displacement: 26.3
}
We'll use the id to tell the code which record to delete. More in a moment.
So, we've done the list pages.
- The page for the public list loops over the record set, showing each record.
- The list page for admins is the same, adding the delete button to each record.
Initialization page
Let's do this one next:
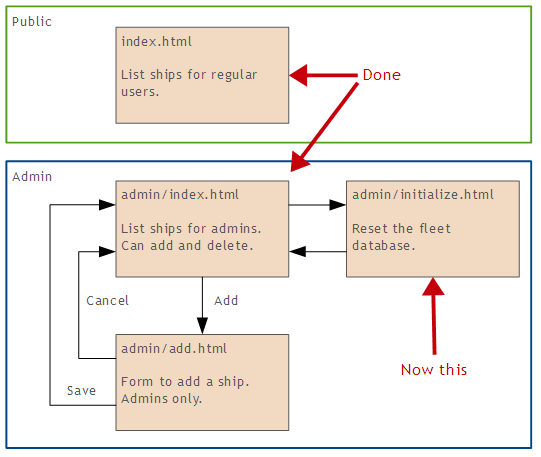
The page looks like:
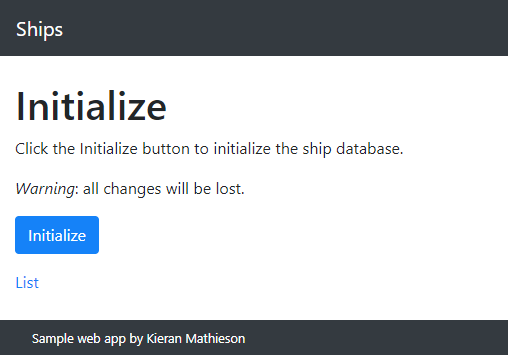
There's only one event, the button click.
Make a TaffyDB
Bind the TaffyDB to localStorage
Make sure the TaffyDB is empty
Insert the record set into the TaffyDB
Nothing new here.
That the third page out of four. One more.
Add page
The last one:
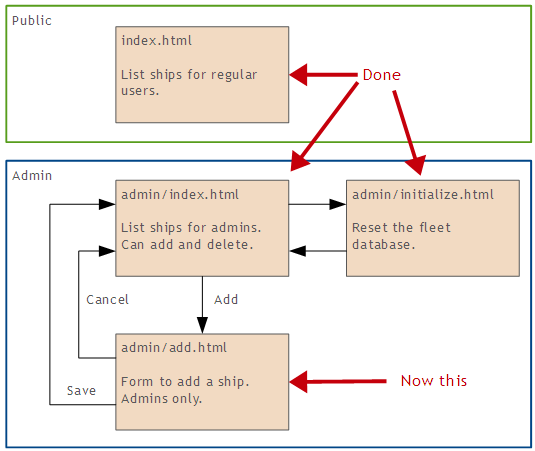
Here's the page:

We'll need code for three events:
- Page load
- Add click
- Cancel click
On page load:
    Make a TaffyDB
    Bind the TaffyDB to localStorage
Now for the Add button:
When the Add button is pressed:
    Validate the form's data
    Make a new ship record
    Add the ship record to the DB
    Jump to the fleet list page
Finally, for the cancel button:
When Cancel button pressed:
    If user confirms:
      Jump to the fleet list page
This is a good time to take a break, if you need one. Before we start into the code. Maybe play with your dog.
Where are we?
We're making an app for a fleet of ships. The app will have four pages. We've designed each page, and written the pseudocode.
Now let's code each page.
Public fleet page
We've done this before. We want this:

Here's the HTML:
<h1>Ships</h1>
<div id="fleet-container" class="hide-on-load"></div>
Our code will work out the HTML needed to show the table, and inject it into fleet-container.
This is the pseudocode again:
On page load:
    Make a TaffyDB
    Bind the TaffyDB to localStorage
    For each ship record:
        Show the ship record
Here's the JS to make a TaffyDb and bind it to localStorage:
//Create an empty Taffy DB.
Fleet.fleetDb = TAFFY();
//Link the DB to localStorage. Existing items will be loaded.
Fleet.fleetDb.store("fleet");
What's left?
On page load:
    Make a TaffyDB  DONE
    Bind the TaffyDB to localStorage  DONE
    For each ship record:
        Show the ship record
Now to loop across the record set, and show each record.
As before, we'll build up the HTML in a variable.
Start by putting the opening tags and table headings into the variable fleetHtml:
var fleetHtml =
    "<table class='table'>" +
    "  <thead>" +
    "      <th>Name</th>" +
    "      <th class='text-center'>Displacement (kT)</th>" +
    "  </thead>" +
    "  <tbody>";
Now loop over the record set, create the HTML for each record, and add it to fleetHtml,
Fleet.fleetDb().order("name").each(function (ship) {
    var shipRow =
        "<tr>" +
        "  <td>" + ship.name + "</td>" +
        "  <td class='text-center'>" + ship.displacement + "</td>" +
        "</tr>";
    fleetHtml += shipRow;
});
Finish off the table HTML in fleetHtml:
//Finish the HTML.
fleetHtml += "</tbody></table>";
Now we just need to inject the HTML into the page, and show it:
//Show it.
$("#fleet-container")
    .html(fleetHtml)
    .show('slow');
Admin fleet page
Now this page:
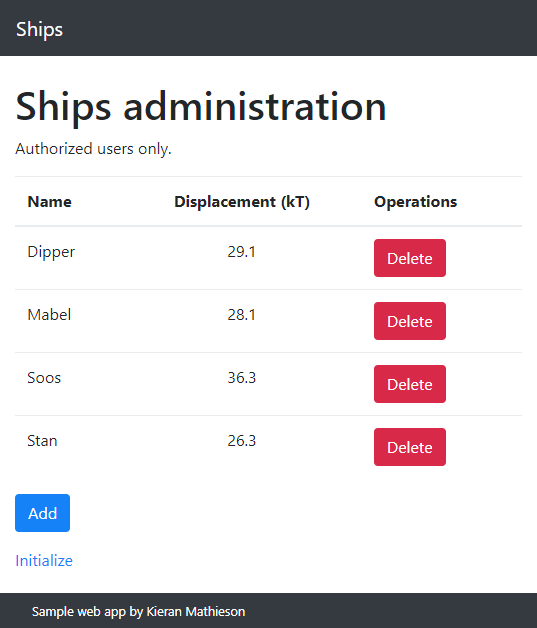
The table is the same as the last page, but with Delete buttons.
Here's the page's HTML:
Our code will work out the HTML needed to show the table, and inject it into fleet-container on line 3.
The Add button is next. It's an <a> made to look like a button. It doesn't need any code. Nor does the link to the initialize page.
OK, that's the HTML. Now the JS. We need code for:
- Page load
- The Delete buttons.
The page load code has to make the HTML for the table, as before. It's a loop like this:
var fleetHtml = HTML TO START TABLE
Fleet.fleetDb().order("name").each(function (ship) {
    ...
    var shipRow = MAKE HTML TO SHOW A RECORD
    fleetHtml += shipRow;
});
fleetHtml += "</tbody></table>";
Each time through the loop, we make the HTML to show a record, and put it in shipRow. Then we append shipRow to fleetHtml.
Take the line:
var shipRow = MAKE HTML TO SHOW A RECORDWhat does the HTML TO SHOW A RECORD look like?
Here's HTML we want our JS to make, for two rows. This is not HTML we type. It's HTML our JS code makes.
The highlighted code shows what will happen when the buttons are clicked. When Dipper's delete button is clicked, this runs:
Fleet.deleteItem(24)24 is Dipper's id. That is how the code will know which ship to remove. Here's Dipper's record:
When Mabel's delete button is clicked:
Fleet.deleteItem(53)53 is Mabel's id. Here's Mabel's record:
So, we want our JS code to create a table row for each record. The table row includes a call to a delete function, that has the id of the record.
Here's how we do it.
The new stuff is on lines 12 to 15:
var deleteButton = "<button class='btn btn-danger' "
    +    "onclick='Fleet.deleteItem(" + ship.id + ") '"
    +    "title='Permanently remove this ship' "
    + ">Delete</button>";
These lines create the HTML that shows a Delete button. The code puts the ship's id in the middle of the HTML. So, if ship.id is 24, we get:
Fleet.deleteItem(24)if ship.id is 53, we get:
Fleet.deleteItem(53)The code for the Delete button is added to the code for a record:
Remember, you can try the app, and use the debugger to see how the code works.
There's a piece missing. The HTML has code like this in it:
Fleet.deleteItem(24)We need to write Fleet.deleteItem(). Here's the pseudocode we decided on earlier.
On delete click:
    If user confirm:
      Delete the record from the database
      Update the fleet list
Here's the JS that will do it:
Fleet.deleteItem = function(itemId) {
    //Is the user sure they want to delete?
    var confirmation = confirm('Are you sure?');
    if ( confirmation ) {
        //Delete the item.
        Fleet.fleetDb({id:itemId}).remove();
        //Show the revised admin page.
        window.location.href = 'index.html';
    }
};
The line that removes the data is:
Fleet.fleetDb({id:itemId}).remove();The first part, fleetDb({id:itemId}), is a TaffyDb query. It says, "Hey, Taffy! Look in fleetDb, and give me all the records that have an id of itemId." The second part says, "Whatever you get back from the query, remove it."
itemId is passed into the function:
Fleet.deleteItem = function(itemId) {Check it out. Our page load code created this HTML for Dipper:
onclick="Fleet.deleteItem(24)"So this code run by a Delete button…
Fleet.deleteItem(24)… gives us…
Fleet.deleteItem = function(24) {
...
Fleet.fleetDb({id:24}).remove()
That means, "Find the record with an id of 24, and delete it."
For Mabel, our page load code created this HTML:
onclick="Fleet.deleteItem(53)"That runs:
Fleet.deleteItem = function(53) {Fleet.deleteItem(53) does this:
Fleet.fleetDb({id:53}).remove()Bye bye, Mabel.
We're using the primary key, to tell us which record to delete. W00t!
Git 'er done
Where are we? We're making this app:

We've done the index pages. They're the most complex. Let's do the others.
Initialize
This is the same as before. Here's the page:

Here's the HTML:
<h1>Initialize</h1>
<p>
    Click the Initialize button to
    initialize the ship database.
</p>
<p><em>Warning</em>: database will be reset.</p>
<p>
    <button id="initialize" class="btn btn-primary"
        onclick="Fleet.initDb()"
    >Initialize</button></p>
<p>
    <a href="../index.html" title="Show the fleet">List</a>
</p>
The button runs Fleet.initDb().
Here's the pseudocode from before:
Make a TaffyDB
Bind the TaffyDB to localStorage
Make sure the TaffyDB is empty
Insert the record set into the TaffyDB
The JS:
Nothing new here. You should be able to match the pseudocode to the JS code.
The Add page
It looks like:

The HTML is as before:
<h1>Ships</h1>
<p>
Add a ship to the fleet, or click Cancel
to forghedaboudit.
</p>
<div class="form-group">
<label for="ship-name">Name</label>
<input type="text" class="form-control"
id="ship-name"
aria-describedby="ship-name-help"
placeholder="Enter a name">
<small id="ship-name-help"
class="form-text text-muted"
>E.g., Fred.</small>
</div>
<div class="form-group">
<label for="ship-displacement"
>Displacement (kT)</label>
<input type="number" min="1" class="form-control"
id="ship-displacement"
aria-describedby="ship-displacement-help"
placeholder="Enter a displacement">
<small id="ship-displacement-help"
class="form-text text-muted"
>E.g., 28.1.</small>
</div>
<p>
<button onclick="Fleet.add()"
class="btn btn-primary" title="Add new ship"
>Save</button>
<button onclick="Fleet.forghedaboudit()"
class="btn btn-danger"
title="Forghedaboudit"
>Cancel</button>
</p>It has the same structure as the dog pack add form.
We'll need code for three events:
- Page load
- Add click
- Cancel click
Pseudocode:
On page load:
    Make a TaffyDB
    Bind the TaffyDB to localStorage
JS:
//Create an empty Taffy DB.
Fleet.fleetDb = TAFFY();
//Link the DB to localStorage. Existing items will be loaded.
Fleet.fleetDb.store("fleet");
Now for the Add button. Pseudocode:
When the Add button is pressed:
    Validate the form's data
    Make a new ship record
    Add the ship record to the DB
    Jump to the fleet list page
The validation is as we've seen before:
var newShipName = $("#ship-name").val().trim();
if ( newShipName == "" ) {
    alert("Sorry, you didn't give a ship name.");
    return;
}
var newShipDisplacement = $("#ship-displacement").val();
if ( newShipDisplacement == "" ) {
    alert("Sorry, you didn't give a displacement.");
    return;
}
Now to make a new ship record. We'll need to have an id for the ship. We'll copy what we did for the dog pack.
//Add a new record.
//Find the highest id so far.
var highestId = Fleet.fleetDb().max("id");
//New ship's id is one more.
var newShipId = highestId + 1;
//Create a new object.
var newShip = {
    id: newShipId,
    name: newShipName,
    displacement: newShipDisplacement
};
The pseudocode again:
When the Add button is pressed:
    Validate the form's data  DONE
    Make a new ship record  DONE
    Add the ship record to the DB  UP TO HERE
    Jump to the fleet list page
Just one line to add the ship record:
Fleet.fleetDb.insert(newShip);Now to jump to the fleet list:
window.location.href = "index.html";Finally, for the cancel button. Pseudocode:
When Cancel button pressed:
    If user confirms:
      Jump to the fleet list page
We've done this before:
Fleet.forghedaboudit = function(){
    if ( confirm("Are you sure?") ) {
        window.location.href = "index.html";
    }
};
All done.

Yes, there is. However, most of it was copied from the dog pack app. There were only two new things:
- Creating an
adminsection, with its own fleet page. - Adding Delete buttons.
When you can, reuse what you've done before.
Exercise
Add a public index page:
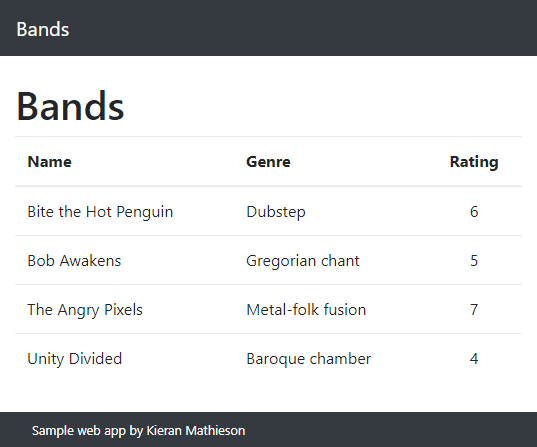
Bands are sorted by name.
Add an admin index page:
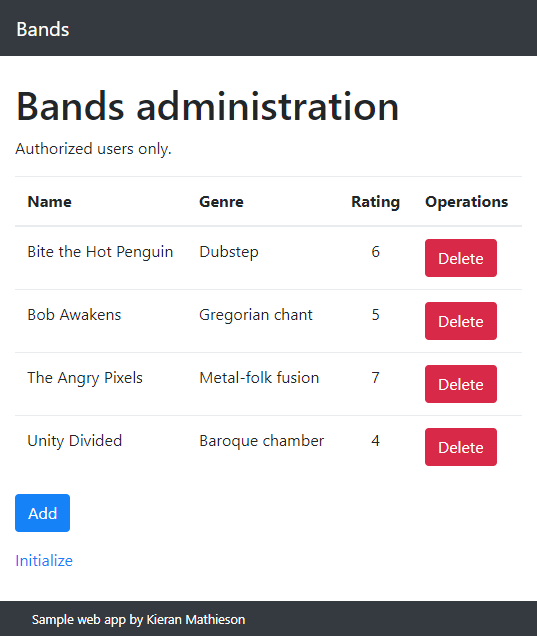
The Delete buttons should work. Confirm the action with the user.
Include an add form:
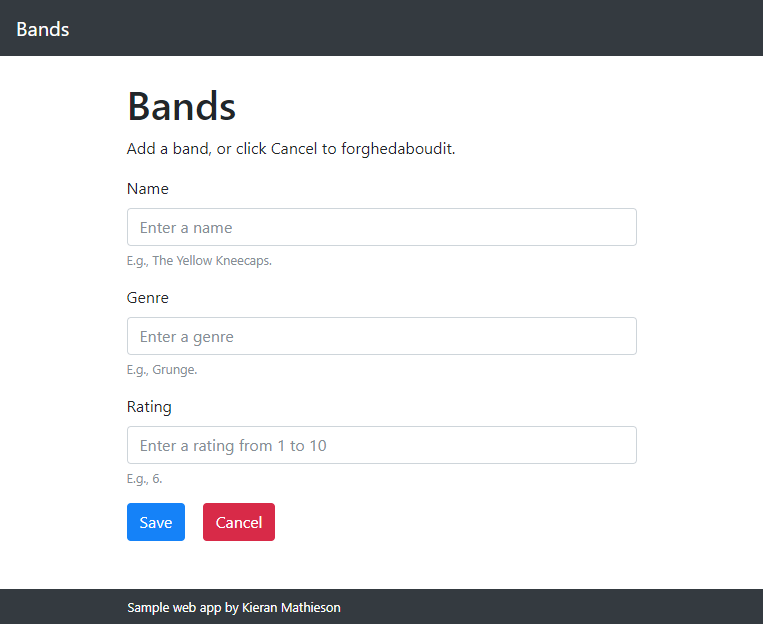
All fields are required. Make sure that ratings are from 1 to 10:
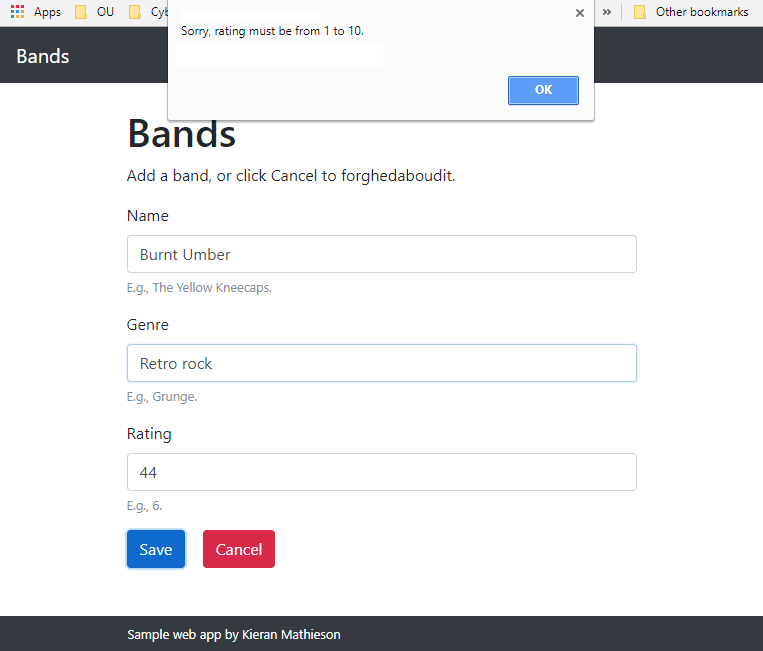
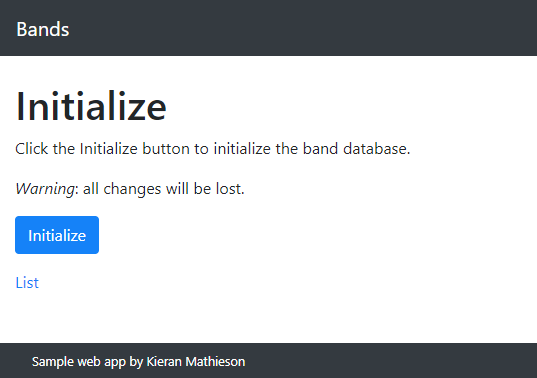
Include an initialization page, linked from the admin index page:
Submit the URLs of both your index pages.
(If you were logged in as a student, you could submit an exercise solution, and get some feedback.)
