The story so far
Yeeeeehaaaa! Creating! Reading! Deleting! We're almost done!
Two things left: Updating, and logging in. Let's do updating. You can try a new version of the ship app.
Edit buttons
Here's the new admin page, with Edit buttons, as well as delete buttons.
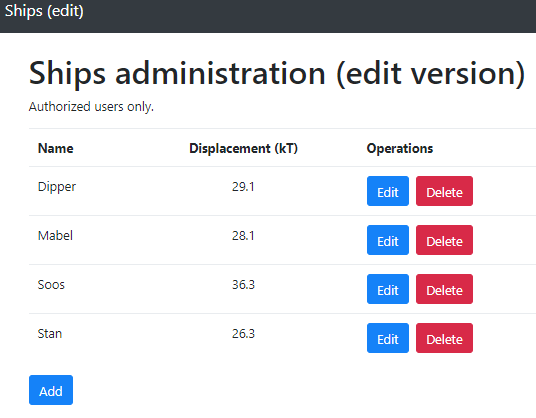
(The image is zoomed out to make it smaller.)
You can try it. Remember, you have to initialize the data first.
How does this compare to the previous version?

I'm guessing it's made in the same way as the delete button?
Yes, it is. Here's the delete button code:
var deleteButton = "<button class='btn btn-danger' "
    +    "onclick='Fleet.deleteShip(" + ship.id + ")'"
    +    "title='Permanently remove this ship' "
    + ">Delete</button>";
Here's the edit button code.
var editButton = "<button class='btn btn-primary' "
    +    "onclick='Fleet.editShip(" + ship.id + ") ' "
    +    "title='Change ship data' "
    + ">Edit</button>";
It calls editShip(), not deleteShip(), and it looks a little different, but it's basically the same thing.
Before we go into the code for editShip(), we need to talk about something else.
The edit form
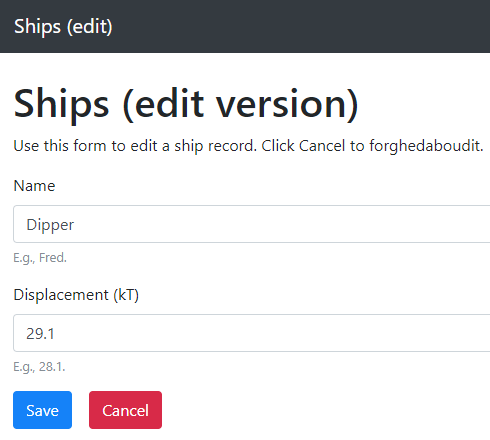
Here it is:

What does the add form for this new app look like?
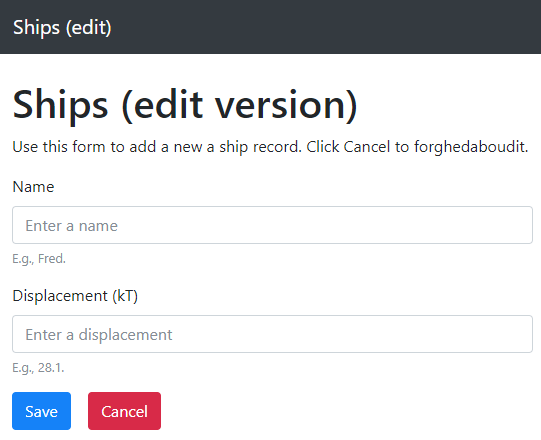

They're almost identical. Ignoring the different headings, which are only so we call the apps apart, there are only three differences between the edit and add form. Here's the edit form again, with the differences highlighted:
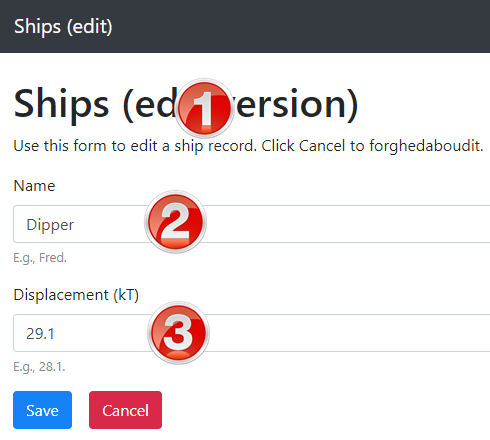
- The instructions are different.
- The name field has data in it when the form loads.
- The displacement field has data in it when the form loads.
You can try it.
We could make two pages, one for add, and one for edit. But let's try something different. Let's make one form. We'll call its file new-edit-item.html. We'll use it for both purposes.
Add or edit
The form can do two operations on the data: the add operation, and the edit operation. But it can only do one at a time.
When the form loads, it has to know what operation the user wants: either add, or edit. How do we do tell the form which one?
Hint: here's the admin form again.

Five of the buttons will jump to new-edit-item.html.

Click on the Add button, and new-edit-item.html gets ready to add a new record.
Click on any of the edit buttons, and new-edit-item.html gets ready to edit a record.
There are several ways we could tell new-edit-item.html what operation the user wants. Let's so what we already know: localStorage.
Here's code for the Add and Edit buttons on the admin page:
<button class="btn btn-primary" onclick="Fleet.newShip()"
    title="Add a new ship">Add</button>
...
var editButton = "<button class='btn btn-primary' "
    +    "onclick='Fleet.editShip(" + ship.id + ") ' "
    +    "title='Change ship data' "
    + ">Edit</button>";
The add button is static HTML. The Edit button is created by JS code in a loop, with one button for each record.
The Add button calls Fleet.newShip(). Here's the function's code:
Fleet.newShip = function() {
    localStorage.setItem('operation', 'new');
    window.location.href = 'new-edit-item.html';
};
The edit button calls Fleet.editShip():
Fleet.editShip = function(shipId) {
    localStorage.setItem('operation', 'edit');
    localStorage.setItem('shipIdToEdit', shipId);
    window.location.href = 'new-edit-item.html';
};
Both functions set the operation key in localStorage, to either 'new', or 'edit'. When it loads, new-edit-item.html can check operation, to see what the user wants to do.
If new-edit-item.html is to edit a record, it needs to know what record the user wants to edit. Fleet.editShip() sends that through localStorage, in the shipIdToEdit key.

operation, and sets itself up.
Right. Here's a diagram of that.
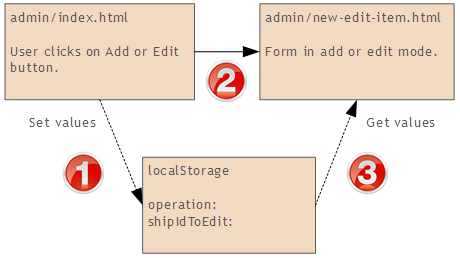
- The user clicks Add (running
newShip), or Edit (runningeditShip).operationis set to either 'new' or 'edit', depending on which function runs. IfeditShipruns, it does something extra: setshipIdToEditto the id of the record the user wants to edit. - The browser jumps to a new URL:
new-edit-item.html. - As it loads,
new-edit-item.htmlreadsoperation, to find out what operation the user wants. If it should be in edit mode, it also readsshipIdToEdit.
When the add/edit form loads
As a reminder, here are the differences between add, and edit:

Here's pseudocode for the form's load event:
Connect to the TaffyDB database
Get the operation from localStorage: either 'new' or 'edit'
If the operation is edit:
    Show the edit instructions (1 in the figure)
    Get the id of the record to edit from localStorage
    Load that record from the database
    Show the record's data in the form fields (2 and 3 in the figure)
Else (it's an add):
    Show the add instructions (1 in the figure)
Here's the code.
Lines 4 to 7 connect Taffy to localStorage as usual.
Line 9 checks if the user wants an edit operation:
if ( localStorage.getItem('operation') == 'edit' ) {If it is, line 11 shows instructions:
$("#form-purpose").html('edit a ship record');This is where form-purpose is defined:
<h1>Ships</h1>
<p>
  Use this form to <span id="form-purpose"></span>.
  Click Cancel to forghedaboudit.
</p>
Since this is an edit, the record's current data needs to be put into the form. First, the browser gets the id of the record from localStorage (line 14):
var shipId = parseInt(localStorage.getItem('shipIdToEdit'));Then it tells Taffy to lookup that record (line 16):
var shipArray = Fleet.fleetDb({id: shipId}).get();Taffy returns an array of records. The first element contains the record. So (line 17):
var ship = shipArray[0];You don't need to understand the deets. Just copy-and-paste this line.
Finally, take the record's fields, and fill in the form's fields (lines 19 and 20):
$("#ship-name").val(ship.name);
$("#ship-displacement").val(ship.displacement);
What if it's an add operation?
if ( localStorage.getItem('operation') == 'edit' ) {
    $("#form-purpose").html('edit a ship record');
    ...
}
else {
    $("#form-purpose").html('add a new a ship record');
}
The only thing we need to do it set the instructions. The form fields are empty already, which is what we need for a new record
Saving
Here's the form again (it happens to be in edit mode).

What happens when the user clicks one of the buttons?
The Cancel button is easy.
Fleet.forghedaboudit = function() {
    if ( confirm("Are you sure?") ) {
        window.location.href = "index.html";
    }
};
The Save button is more complex, though much of it we've done before. Here's the pseudocode:
Here's some code:
The jump to index.html is after the if. That means it happens after an add, or an edit.
Let's look at the edit code. We need to change the existing record to the data in the input fields. You can try the app.
Here's the code.
First, we make an updated record. Recall that records have three fields:
{
    id: 11,
    name: "Stan",
    displacement: 26.3
}
The id we can get from localStorage. The others are in variables we've already validated. So this will make an updated record:
var shipId = parseInt(localStorage.getItem('shipIdToEdit'));
var updatedShip = {
    id: shipId,
    name: shipName,
    displacement: shipDisplacement
};
Next to update the DB with the new record:
Fleet.fleetDb({id: shipId}).update(updatedShip);Fleet.fleetDb({id: shipId}) is a Taffy query. It grabs the record with the given id. update(updatedShip) updates the data in that record.
Summary
You can use the same page for editing and adding. Tell the page what operation to perform. Set the page up during page load.
Woohoo! We have all the CRUD letters.
