The story so far
We have a template. To make a new page, we copy-and-paste the template. The template has JS to load reusable HTML for the navbar and footer.
Use onclick to tell a browser what code to run when an HTML element is clicked.
Code is broken into pieces, triggered by events. Use variables to coordinate the pieces of code.
Planning
We are going to start planning our projects. We're not going to do it formally, with lots of charts, as you might do in a systems analysis and design course. We'll use a simple planning method.
There are four steps in our planning:
- Understanding the goal
- Drafting screens, with fields and buttons
- Saying what happens when events occur
- Write pseudocode
Goal
OK, let's outline the goal. We're going to make an app for a university course. The course has two projects, and one exam. Users will enter their scores on all three. The app will tell them what their final course percentage is.
The first project has a maximum score of 50, and is worth 30% of the grade. The second project has a maximum score of 40, and is worth 30% of the grade. The exam has a maximum score of 100, and is worth 40% of the grade.
The course score will be: project 1 score / 50 * 30 + project 2 score / 40 * 30 + exam score / 100 * 40.
So that's the goal. The user types in three numbers, then the app uses the formula.
What do you think?


OK, that's a good idea.
So here's the revised goal list:
- The course has two projects, and one exam. Uses will enter their scores on all three. The app will tell them what their final course percentage is.
- The first project has a maximum score of 50, and is worth 30% of the grade. The second project has a maximum score of 40, and is worth 30% of the grade. The exam has a maximum score of 100, and is worth 40% of the grade.
- The course score will be: project 1 score / 50 * 30 + project 2 score / 40 * 30 + exam score / 100 * 40.
- Validate, to check that the user entered reasonable data.
- Only show the output when all of the input data is valid.
- Round the final course percentage.
Recall that there are four steps in planning:
- Understanding the goal DONE
- Drafting screens, with fields and buttons
- Saying what happens when events occur
- Write pseudocode
We've done the first one, understanding the goals.

Good point. That happens often. You'll need to go back, revise the goals, maybe change the screens, and so on.
Like bugs in code, specification changes are normal. Having a process for converting requirements into code makes it easier to handle spec changes.
On to the next step.
The screen
The app only has one screen. Here's a mock up:
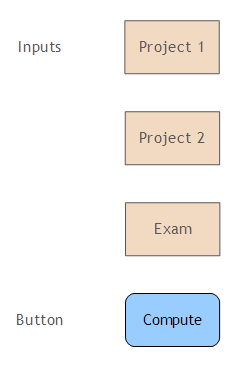
There's no output, because the output doesn't show until all inputs are valid. When they are, and the user hits Compute, the course percentage shows below the button:
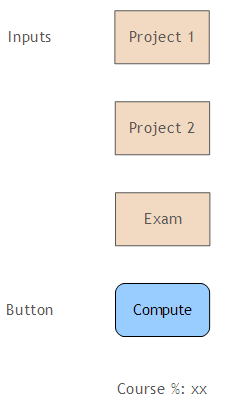
OK, we have a screen mock up.
Here are the planning steps again.
- Understand the goal DONE
- Draft screens, with fields and buttons DONE
- Say what happens when events occur
- Write pseudocode
We've got the first two.
Events
We want to know what events we'll capture, and what will happen for each one.
There's only one event we care about: clicking the compute button. What happens?
- Click Compute: Validate input, then output course %
This event spec will help us see the big picture. How all the events work together to make the entire app work. This app only has code for one event, but future apps will be more complex.
How the last step.
Pseudocode
The steps:
- Understand the goal
- Draft screens, with fields and buttons
- Say what happens when events occur
- Write pseudocode
The last step is a repeat of the previous one, in more detail. We'll rough out the logic of each chunk of code. Pseudocode is not a formal language, just something programming-language-ish that helps us think about what should happen.
We only have one chunk of code, for the button event. Here's one way to do it.
If the score for project 1 is not valid:
  Show an error message
  Stop
If the score for project 2 is not valid:
  Show an error message
  Stop
If the score for the exam is not valid:
  Show an error message
  Stop
Compute the course score
Output the course score
How's that look?

Wouldn't it be better if they got both error messages the first time, so they could correct the data in one go?

Yes, that is good thinking. The code is more complex, though. Let's leave that as a todo for now, and add it later.
- Todo: report all input errors at once.

- Understand the goal
- Draft screens, with fields and buttons
- Say what happens when events occur
- Write pseudocode
What is the difference between the last two?
In the third step, you think about all of the events, and how they work together. You might have several buttons, some input fields, and other things. You think about how they work together, to reach the goals.
In the fourth step, you take each event separately, and go into more detail about what the code does.
If you combine the last two steps, that's fine. The app we're looking at now is so simple that combining them would make sense.
Later, we'll be making CRUD apps, with multiple pages, a login system, forms for adding and updating data, and other things. Having the big picture that the third step gives will be more important.
Implementation
The planning is done, so let's implement.
We could write all of the HTML, then all of the JS, and then test the whole thing. How would that be?

Baby steps. Write a bit, test it, write more, test it.
Good idea. If you have a bug in a whole bunch of code, it's hard to find. If you have a bug in a little code, it's easier. So let's write a bit, test it, write some more, test it, and so on.
OK. Let's start with some HTML for an input.
HTML: input fields
Let's go to the Bootstrap form documentation, and copy and paste. Here's a sample from their site, for an email input field.

There's a label (Email address), the input box, and some help below the box. The input box has a placeholder value (Enter email). It goes away when the user starts typing in the box.
Here's the code from the Bootstrap docs:
Lines 1 and 9 are a container for the field. A container is also called a wrapper.
Line 2 is the label. Lines 3 to 5 are the input field itself. It has an id that uniquely identifies the field. Notice that the id is used in the for attribute of the <label> on line 2. That ties them together.
Notice that the code from the BS site does not use our coding standards. From the BS site:
id="exampleInputEmail1"We would use something like:
id="example-input-email1"Lines 6 to 8 are the help. It has an id as well, used in the aria-describedby attribute of the <input> tag. That helps screen readers, that is, software that helps visually impaired people use the web.
The classes make everything look right. Leave them alone, and let BS handle it.
The BS docs start everything with a <form> tag. Do not use that. It's used when there's server-side processing of your data. We do all processing in the browser. The <form> tag will just get in the way.
Let's change the BS code to what we want. We want something like this:

Here's some code:
The things I changed are marked. You should be able to make sense of them all.
Notice type="number". That means the input field will only accept numeric data. If the user types letters, the browser will ignore them.
We've figured out the HTML for just one of the input fields. We'll leave the others until later.
The button
In our plan, our code is triggered by the Compute button.

Let's add it to the HTML, so we can start adding and testing code for our one input field. Baby steps. We'll add the other input fields later.
Here's some code from the BS buttons docs.
<button type="button" class="btn btn-primary">Primary</button>Don't use type="submit". That sends data to the server, for server-side processing.
Let's change it to:
<p>
  <button onclick="CourseScore.compute()"
    type="button" class="btn btn-primary">Compute</button>
</p>
It's wrapped in a <p> tag, to make sure the button has its own line on the web page.
The stuff in onclick is JS code. It will run a function.
Starting the JS
Let's call the project's namespace CourseScore. So the adjusted JS template is:
Upload everything to the server to check…there's the header and footer, an input field, and a button… OK, yes, that worked.
Try it yourself, with the code we have so far.
Here's the button code again:
<p>
  <button onclick="CourseScore.compute()"
    type="button" class="btn btn-primary">Compute</button>
</p>
How can we tell if that will work? A baby step. Let's add the CourseScore.compute() function to the JS, and have it do something simple.
Lines 5 to 7 are new. Click the button, and the message should show. Let's try it… Hey, it worked!
Don't forget to open the dev tools console, so you see any error messages.
Now another baby step. Here's the pseudocode again:
If the score for project 1 is not valid:
  Show an error message
  Stop
If the score for project 2 is not valid:
  Show an error message
  Stop
If the score for the exam is not valid:
  Show an error message
  Stop
Compute the course score
Output the course score
Let's look at the first line:
If the score for project 1 is not valid:We're going to need to get the score for the first project, before we can check it.
var project1Score = $("#project1-score").val();This says, "Find something with an id of project1-score. Get its val. Put the result into a new variable project1Score."
val() gets the contents of an input field.
OK, how will we know if the val() works?

alert()? CourseScore.compute = function() {
var project1Score = $("#project1-score").val();
alert("Project 1 score: " + project1Score);
}Now let's type something in the input field, click Compute… Hey, it worked!
Try it.
This is a debug message, added for testing. You should add a lot of them as you work.
Logging to the console
alert() is good for showing messages on the screen, but it interrupts the user. A less intrusive way to show debug messages is to log them to the console. You have it open already, right?
Try this:
CourseScore.compute = function() {
  var project1Score = $("#project1-score").val();
  console.log("Project 1 score: " + project1Score);
}
Now the debug message shows in the console, without disturbing the user interface.
JavaScript: validation
Here's the pseudocode:
If the score for project 1 is not valid:
  Show an error message
  Stop
Here's what we have, without the debug messages:
CourseScore.compute = function() {
  var project1Score = $("#project1-score").val();
}
Let's add an if. JS tests work the same as they do in other languages. Here's a beginning:
CourseScore.compute = function() {
  var project1Score = $("#project1-score").val();
  if ( project1Score == "" ) {
    alert("Sorry, project 1 score must be between 0 and 50.");
  }
}
if:
if ( project1Score == "" ) {It compares project1Score, that we want to be a number, with "", which is a string. An empty one, but still a string.
Here's the code that sets the variable.
var project1Score = $("#project1-score").val();The val() function always returns a string, even if the user typed digits. So, for example, if someone typed a 4 and then a 2 into the field, val() would return the string "42", not the number 42.
However, JS is a loosely-typed language. It will convert strings to numbers for comparisons like project1Score < 0. It almost always works. Later, we'll see cases where it's safer to convert strings to numbers explicitly.
In…
if ( project1Score == "" ) {== means "equal to." So project1Score == "" is true if project1Score is an empty string. That's what it will be if the user didn't type anything in the field.
Here are some other operators for if() statements that we'll use:
- "!=" means "not equals."
- "<" means "less than."
- ">" means "greater than."
- "&&" means "and."
- "||" means "or."
- "!" means "not."
Don't use "&" or "|" instead of "&&" or "||". "&" and "|" are bit-wise operators. They don't work the same.
Add more to the test, for negative numbers:
CourseScore.compute = function() {
  var project1Score = $("#project1-score").val();
  if ( project1Score == "" || project1Score < 0 ) {
    alert("Sorry, project 1 score must be between 0 and 50.");
  }
}
|| means "or." So if project1Score is empty, or is less than 0, run the alert().
Finish off the test, by making sure that the score isn't too big:
CourseScore.compute = function() {
  var project1Score = $("#project1-score").val();
  if ( project1Score == "" || project1Score < 0 || project1Score  > 50 ) {
    alert("Sorry, project 1 score must be between 0 and 50.");
  }
}
We're almost done with this bit of validation. Here's the pseudocode:
If the score for project 1 is not valid:
  Show an error message
  Stop
What about the Stop? Here's how.
CourseScore.compute = function() {
  var project1Score = $("#project1-score").val();
  if ( project1Score == "" || project1Score < 0 || project1Score  > 50 ) {
    alert("Sorry, project 1 score must be between 0 and 50.");
    return;
  }
}
return exits from the function. So CourseScore.compute() stops, and never gets to show any output.
Try it.
We should also add a comment, explaining what the code does.
CourseScore.compute = function() {
  //Validate project 1 score.
  var project1Score = $("#project1-score").val();
  if ( project1Score == "" || project1Score < 0 || project1Score  > 50 ) {
    alert("Sorry, project 1 score must be between 0 and 50.");
    return;
  }
}
Breaking out the tests with a multiway if
Instead of one if with one error message, we could break out the tests, and give more specific error messages.
CourseScore.compute = function() {
  //Validate project 1 score.
  var project1Score = $("#project1-score").val();
  if ( project1Score == "" ) {
    alert("Sorry, you must enter a project 1 score.");
    return;
  }
  else if ( project1Score < 0 ) {
    alert("Sorry, the project 1 score cannot be negative.");
    return;
  }
  else if ( project1Score > 50 ) {
    alert("Sorry, the project 1 score cannot be more than 50.");
    return;
  }
  //Continue
  ...
}
There's a chain of else ifs. Only if all pass, does CourseScore.compute() continue. If any of the tests fail, CourseScore.compute() exits. It's a useful pattern.
JavaScript: computation
We don't have all of the input yet, but let's start on the computation anyway.
Here's the pseudocode:
If the score for project 1 is not valid:
  Show an error message
  Stop
[SKIP FOR NOW]
  If the score for project 2 is not valid:
    Show an error message
    Stop
  If the score for the exam is not valid:
    Show an error message
    Stop
[/SKIP]
Compute the course score
Output the course score
How about this?
var courseScore = (project1Score/50*0.3) * 100;The * and / mean the same as they do in other languages.

Oh, right. Thanks.
var courseScore = (project1Score/50*0.3) * 100;
var roundedScore = Math.round(courseScore);
The Math object does rounding. It gives random numbers, knows what pi is, and other mathy things.
Here's the code so far:
CourseScore.compute = function() {
  //Validate project 1 score.
  var project1Score = $("#project1-score").val();
  if ( project1Score == "" ) {
    alert("Sorry, you must enter a project 1 score.");
    return;
  }
  else if ( project1Score < 0 ) {
    alert("Sorry, the project 1 score cannot be negative.");
    return;
  }
  else if ( project1Score > 50 ) {
    alert("Sorry, the project 1 score cannot be more than 50.");
    return;
  }
  //Compute course score.
  var courseScore = (project1Score/50*0.3) * 100;
  var roundedScore = Math.round(courseScore);
}
Output HTML
The pseudocode again:
If the score for project 1 is not valid:
  Show an error message
  Stop
[SKIP FOR NOW]
  If the score for project 2 is not valid:
    Show an error message
    Stop
  If the score for the exam is not valid:
    Show an error message
    Stop
[/SKIP]
Compute the course score
Output the course score
The last step is to output the course score. Let's make it like this:

We need a place for the output score in the HTML.

Oh, right. Thanks the for the reminder. We need to hide the output to start with, then show it if all of the input is OK.
Here's some HTML:
The <p> tag contains the entire output region: the label "Course score," the place for the score output (like "80," or whatever it is), and the help.
The container needs to be hidden at first, and appear when the output is ready to go.
How to do this? The container has the class hide-on-load.
The class name is something we make up, and add to project-styles.css. Here it is:
.hide-on-load {
  display: none;
}
display: none; does what you think. Anything with the class hide-on-load is hidden. So, the container, and therefore the entire output section, will be invisible.

Let's look at the ids.
There are two. The container has an id, and so does the <span> that contains the course score.
When you see an element with an id, you should think to yourself, "Self, the id makes the element easy to mess with in JavaScript."
The output JS
You've seen code like line 2 before. "Find something with an id of course-score, and set its HTML to the value of roundedScore." course-score is the <span> id:
Now this line:
$("#course-score-container").show();It says, "Find something with an id of course-score-container, and show it."
Here's that id:
The id refers to the container. So…
$("#course-score-container").show();… makes the entire output region visible.
Here's the JS so far:
CourseScore.compute = function() {
  //Validate project 1 score.
  var project1Score = $("#project1-score").val();
  if ( project1Score == "" ) {
    alert("Sorry, you must enter a project 1 score.");
    return;
  }
  else if ( project1Score < 0 ) {
    alert("Sorry, the project 1 score cannot be negative.");
    return;
  }
  else if ( project1Score > 50 ) {
    alert("Sorry, the project 1 score cannot be more than 50.");
    return;
  }
  //Compute course score.
  var courseScore = (project1Score/50*0.3) * 100;
  var roundedScore = Math.round(courseScore);
  //Output the score.
  $("#course-score").html(roundedScore);
  //Show the output region.
  $("#course-score-container").show();
}
Groovy, man!
The flag pattern
We need more input and validation, but before we do that, let's work out how to do what Georgina asked for:
- Todo: report all input errors at once.
Right now, if there's an error for project 1, the program stops before checking the scores for project 2, and the exam. Let's make it so that it reports all input errors before it stops.
For that, we can use the flag pattern. We use a variable to show whether something happened or not. Here's some pseudocode:
We set the flag to true at the start. If anything goes wrong (lines 2 to 10), we set the flag to false. After all of the tests, we check the flag (line 11). If any of the tests detected bad data, the flag will be false, and the program will stop.
If we get to line 13, then the validation is done. We know that the data is OK. Now we can forget about data errors, and just think about computing the score.

When you write the rest of the code, you don't need to keep validation in your head. It's over and done with.
Our JS would be:
This would test all of the fields, showing all of the input errors. Then it would stop if any errors were found.
In fact, that's all of the code! Well, except for validating the other inputs, and using them to compute the score. That's a copy-and-paste job, since what works for project 1 works for the other inputs, too.
Messing up ifs
We used several if statements. There's a subtle problem that will drive you crazy, unless you know to look for it.
Here's some code:
What do we expect to happen?
Well, line 1 sets the variable legs to 6.
Line 3 checks whether legs is 8. It isn't, it's 6. So, the else is run, setting creature to "an insect".
The last line is:
alert("That's " + creature + ". It has " + legs + " legs.");When used with strings, "+" means append, or concatenate. It joins strings together.
Since creature is "an insect", and legs is 6, the last line should show "That's an insect. It has 6 legs."
It has to work, it's so simple. Right?
Try it in this sandbox.
Whaaat?! This is cray-cray! How can it say that we have a spider?
The problem is the if statement. What we meant to type was:
if ( legs == 8 ) {What we actually typed was:
if ( legs = 8 ) {See the difference? We typed one =. We should have typed ==.
One = means something. It's an assignment statement, like:
var legs = 6;This says, "Takes whatever is on the right, and put it in the variable legs."
We told the browser to evaluate:
if ( legs = 8 ) {There's an assignment statement inside the if, instead of the test we wanted.
This says, "Take the 8, and put it into legs (overwriting the 6 that was there). Then test if that is true." Any number other that 0 tests as true.
Try adding the extra = in the sandbox. See if it works.

legs.
That sucks! It's would be hard to find one missing =!
It does suck. But it's the way JavaScript works. And other languages, like C.
Two things can help. First, write code in baby steps. Write a bit, test a bit, write a bit, test a bit. If you only have to check a small piece of code, it will be easier to find the error.
Code quality tools
Second, your IDE might help. Here's how the code looked in WebStorm:
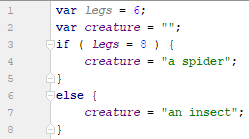
There's no warning.
Let's use WebStorm's settings to turn on JSHint, a code quality inspector:
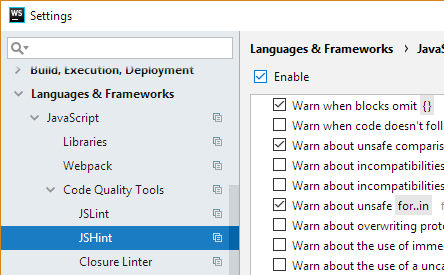
This is what the code looks like then:
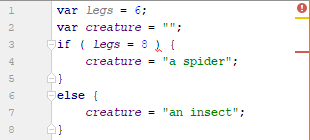
Now, we get a warning. Position the mouse cursor on the code:

Thank you, WebStorm!
Most IDEs have code quality tools. Another reason to use an IDE, and not a plain editor, like Notepad++.
The code quality tools are programs, and therefore stupid. They sometimes mark code that isn't a problem at all. That's why some programmers leave them turned off, then turn them on occasionally to check for problems.
When you have a bug, you could turn on code quality tools, until you fix the bug. They sometimes help.
CoolThing
Randomly invert paragraphs.
Exercises
Submit the URL of your solution.
(If you were logged in as a student, you could submit an exercise solution, and get some feedback.)
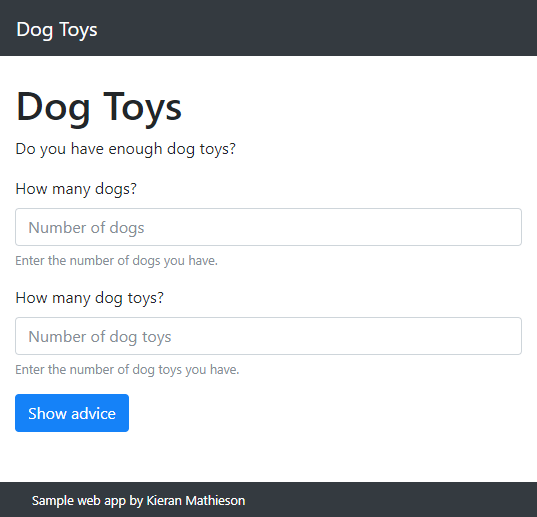
The user fills in the fields, and clicks Show advice. First, the app validates the input data. Make sure that:
- Neither field is empty.
- Neither field contains a negative number.
Show appropriate error messages. For example:
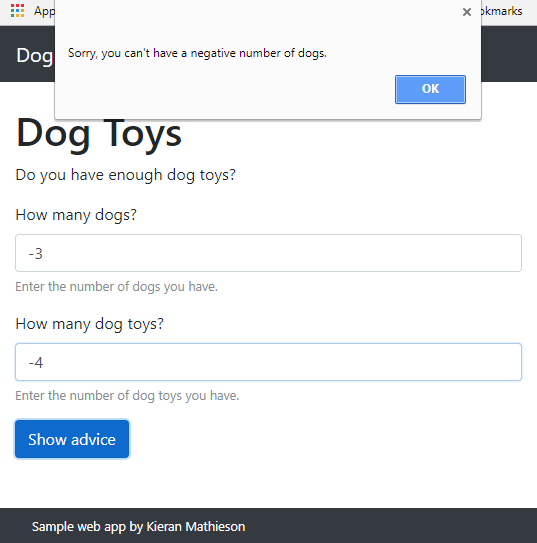
Use the flag pattern so that all applicable error messages show. In this case, after the user clicks OK, another message would appear for dog toys.
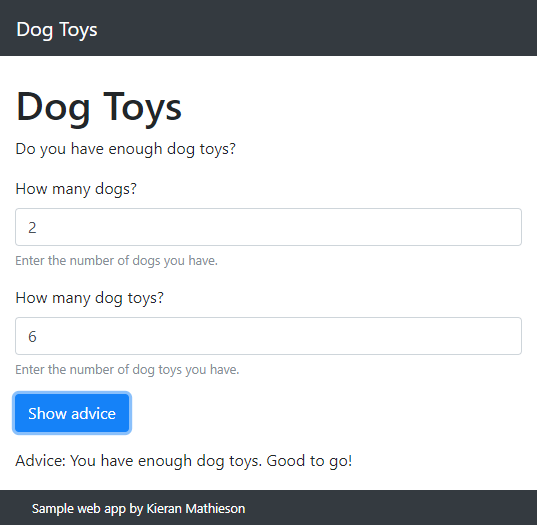
If the data is OK, show some advice on the page. Show the advice below the button.
- If there are more dogs than dog toys, show "You don't have enough dog toys! Get some more."
- If there are more dog toys than dogs, show "You have enough dog toys. Good to go!"
- If there the same number of dogs and dog toys, show "You have just enough dog toys, but no extra. Get some spares."
For example:
Submit the URL of your solution.
(If you were logged in as a student, you could submit an exercise solution, and get some feedback.)
Summary
- To plan an app:
- Understand the goal
- Draft screens, with fields and buttons
- Briefly say what happens when events occur
- Write pseudocode for all events
- Write code in baby steps. Write a bit, test it, write more, test it.
- Adapt code for input fields from the Bootstrap docs
- Use
if()statements for validation.- "==" for "equals."
- "!=" means "not equals."
- "<" means "less than."
- ">" means "greater than."
- "&&" means "and."
- "||" means "or."
- "!" means "not."
- Watch out for = instead of == in ifs.
- Use a class like
hide-on-loadto hide HTML containers when a page first shows. You need to declarehide-on-loadin your stylesheet. - Use the flag pattern if you want to run all validations.
